|
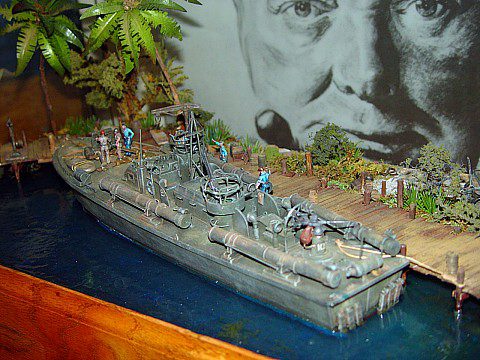
Above: The completed model inside one of my showcases. Churchill gestures assertively in a poster behind
the showcase. Painting 1/72 men proved very challenging, but no more challenging then finding suitable figures in this scale
to use as Navy crewmen. Many Australian and British infantry lost arms, legs and heads to come up with the figures seen here.The
casting resin used for the water is very tricky, and has to be mixed and poured just right. I had used it twice before, in
a C-47 floatplane model and for my OS2U Kingfisher - but in both these models the depth of the water was about 1/2 of that
used for PT-109. I would learn to regret having made the water here so deep. More on this later.
|
 |
|
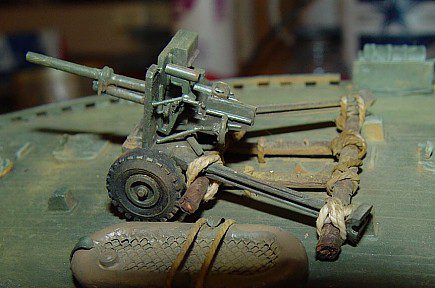
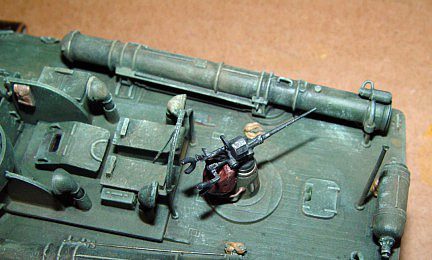
Above: Jack Kennedy had decided his ship lacked firepower, and so he shipped a 37mm anti tank gun he had
found "lying around" on the island of Tulagi (he "borrowed" it indefinitely), across the channel from
Guadalcanal in the Solomon Islands. I could not find clear pictures of how the gun was fastened to the deck, so I based my
model on some fleeting shots from the movie "PT-109". This 1/72 scale 37mm was made completely from scratch. Lt.
(jg) John Kennedy and his crew never got to use the gun - on their first patrol with the new weapon, their PT boat was sliced
in half while patrolling the Blackett Straights at 2AM on the night of August 2, 1943, by the Japanese destroyer Amagiri.
The raft is made of clay, with fabric "tool" to simulate the webbing.
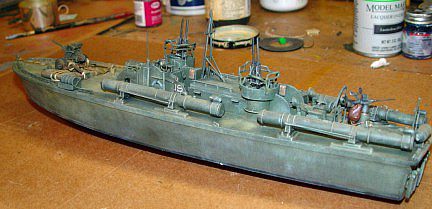
Right: The foredeck of PT-109. PT boats were wooden ships, usually about 70-90 feet in length. PT-109 was
80 feet long and built by ELCO. In 2002, PT-109's remains were found by guess who - Bob Ballard. The disposition of the wreck
is yet to be resolved by the US Navy.
Above and below: The completed PT-109 sits on my shop desk, awaiting immersion in the resin.
Continued from right: I pondered and cursed for a while. In teaching my son how to rectify model errors,
I have always told him no error is beyond repair...but I was not sure about this one. With only two layers of resin left,
there was no way to cover up the bubbles without painting the layer completely, thereby negating any depth and hiding all
the algae and coloring below. Unacceptable. I came up with an idea. Usine a propane torch, I melted a lot of the bubbles away.
Others I covered with "floating" algae, and some were just painted over. Still others I punched out with a nail, and then
added acetone to dissolve the resin and fill the hole. Using these methods, I covered up about 75% of the bubbles. The rest
are still there, a reminder that I am still fallible after all the care I take and experience I have !
|
|
|
|
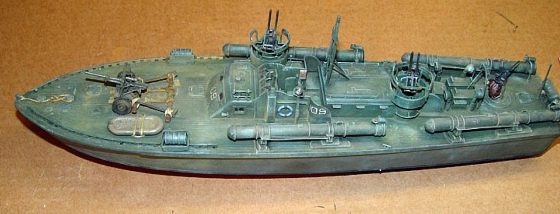
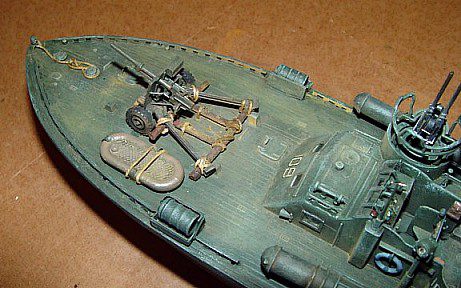
Above: A close up of the rear deck, showing the 20mm Oerlikon anti aircraft gun. A lot of detail had to be
added to make the gun presentable, not the least of which is the canvas bag below the gun designed to catch the spent shells
fired from the gun. The bag here is made of clay. The armrests are made from small electrical wire. The 20mm was useful against
aircraft at close range; unfortunately this range was also usually within the range of the incoming aircraft's guns as well.
The 20mm Oerlikon was license built in the US and has its origins from an early German design, eventually bought by the Swiss
firm Oerlikon Contraves. Variants are still used today.
|
|
|
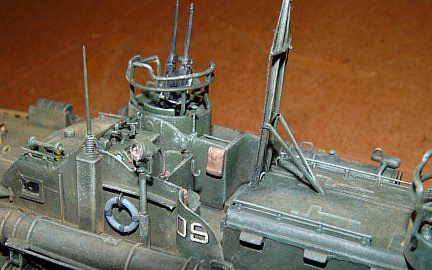
Above: The center cabin section and wheelhouse of PT-109. The boat's controls can be seen behind the splash
shields, as well as the scratchbuilt searchlight, antenna and twin .50 caliber guns. All the controls, including the torpedo
sight just visible behind the windshield, were all built from scratch. The original guns from the kit were very poorly detailed,
so I used 1/48 scale .30 caliber guns to simulate the larger 50's in the smaller scale. It worked out ok! Just for kicks,
I made a swivel for the guns - they rotate and elevate freely. The boat's horn, seen at far left, is from an HO scale locomotive.
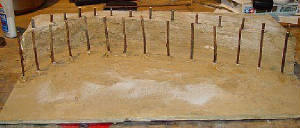
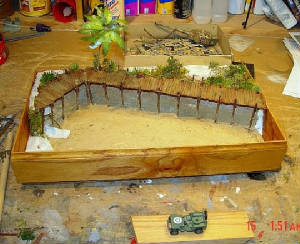
Above: Two pictures of the Celluclay land/seascape. The posts for the dock are real twigs and are inserted
while the Celluclay is wet. Care must be taken that they line up correctly. The completed dock is shown in the next picture
with the diorama frame in place. I built the dock exactly as it would be done in real life - one plank at a time. Still to
be added is the bottom color for the lagoon floor, and also the plant life and some detritus of war, such as barrels and tires.
The toy jeep in the front will be converted and added at the top right of the diorama. I made the depth too large - so many
layers of resin were needed to fill it that the probability of mixing one layer incorrectly was multiplied...and that is exactly
what happened with the third to last layer. The boat was already embedded, so there was no going back. The layer in question
had too much accelerant, and when dry, I discovered to my horror that several dozen bubbles had appeared, completely destroying
the layered look of color and depth I had wanted. The next step is explained at left.
PREVIOUS PAGE
NEXT PAGE
|
|