MILITARY DIORAMAS by Paul Asaban

Photo Album 6 - Building the Flakvierling

Home
About me
Photo Album 1 - The Road to Minsk
Photo Album 2- The Road to Minsk
Photo Album 3 - The Road to Minsk
Photo Album 4- OS2U Kingfisher
Photo Album 5 - Flakvierling
Photo Album 6 - Building the Flakvierling
Photo Album 7 - Dauntless SBD
Photo Album 8 - Dauntless SBD
Photo Album 9 - Channel Gazing
Photo Album 10 - Stuka and Matilda
Photo Album 11- ME-109 and Spitfire V
Photo Album 12 - Anzio
Photo Album 13 - Anzio
Photo Album 14 - Bastogne Aftermath
Photo Album 15 - Normandy Ambush & more
Photo Album 16 - The First Time I Saw Paris
Photo Album 17- Aachen 1944
Photo Album 18 - Aachen 1944
Photo Album 19 - PT109
Photo Album 20 - "Corner Kick" Curtiss P-40
Photo Album 21 - Building "Corner Kick"
Photo Album 22 - Black Widow
Photo Album 23 - Assorted models
Photo Album 24 - Somewhere in Saudi (A-10)
Photo Album 25 - Top Gun Air Show
Photo Album 26 - Top Gun Airshow 2
Photo Album 27 - The Mother of all Battles
Photo Album 28 - The First Night - F-111
Photo Album 29 - My kids are in on the action - Christian's Dioramas
Photo Album 30 - My kids are in on the action - Nicole's Dinosaurs
Photo Album 31 - Coming Soon - Operation Market Garden
Photo Album 32 - The War Room
Photo Album 33 - Antique Ships Restoration Project
Photo Album 34 - Restoration Project II
Photo Album 35 - Restoration Project III
Photo Album 36 - Restoration Project IV
Contact Me
Related Links

WORLD WAR II DIORAMAS
Building "The Weather Clears"

flakundone.jpg

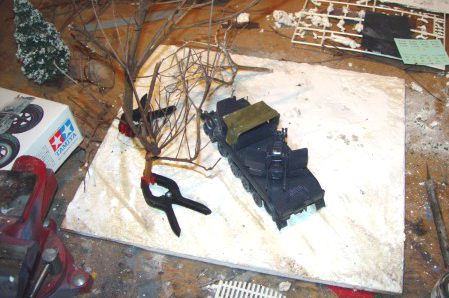
Above: The completed first stage, with the base and model. The original roof of the cab has been tossed, and a new one built with metal framing, sheet plastic and a tissue paper top over the plastic. Wet the tissue in a solution of white glue and water. Carefully drap in place. When dry, snip or razor cut any excess, then paint it, dry brush it, weather with pastels...and you're done! The trees are held by clamps as I play with their positioning. Originally, the model was moving away from the front, and there was to be no building. Things changed.

Ardennesfarmunfinished.jpg

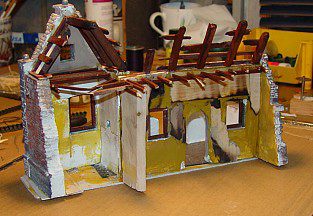
Above: The completed first stage of the house. Extra walls are in place, and rudimentary roofworks have been added. At this stage, I am experimenting with wall colors and textures.

Ardennesfarmunfinished2.jpg

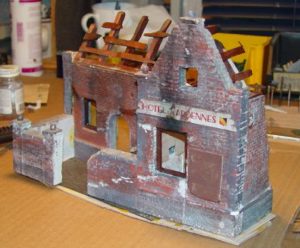
Above: The house in a preliminary stage. My son originally made this house from a Verlinden kit, and above is how I got it from him. Unbelievable for a 12 year old. The walls were badly nicked from sitting in the workshop for so long, so I filled them in with wood filler and started to recolor the house. The brick walls are first painted grey-brown, the color of the mortar. I then go over the raised bricks with colored oil pastels in a light sweeping motion, being careful not to press hard enough to color the cracks, leaving the mortar color intact. I then touch up with paint, randomly off coloring several bricks, and then coat the whole works with dull coat. Pastels add the final smoke marks and weathering.

PREVIOUS PAGE

NEXT PAGE