MILITARY DIORAMAS by Paul Asaban

Photo Album 4- OS2U Kingfisher

Home
About me
Photo Album 1 - The Road to Minsk
Photo Album 2- The Road to Minsk
Photo Album 3 - The Road to Minsk
Photo Album 4- OS2U Kingfisher
Photo Album 5 - Flakvierling
Photo Album 6 - Building the Flakvierling
Photo Album 7 - Dauntless SBD
Photo Album 8 - Dauntless SBD
Photo Album 9 - Channel Gazing
Photo Album 10 - Stuka and Matilda
Photo Album 11- ME-109 and Spitfire V
Photo Album 12 - Anzio
Photo Album 13 - Anzio
Photo Album 14 - Bastogne Aftermath
Photo Album 15 - Normandy Ambush & more
Photo Album 16 - The First Time I Saw Paris
Photo Album 17- Aachen 1944
Photo Album 18 - Aachen 1944
Photo Album 19 - PT109
Photo Album 20 - "Corner Kick" Curtiss P-40
Photo Album 21 - Building "Corner Kick"
Photo Album 22 - Black Widow
Photo Album 23 - Assorted models
Photo Album 24 - Somewhere in Saudi (A-10)
Photo Album 25 - Top Gun Air Show
Photo Album 26 - Top Gun Airshow 2
Photo Album 27 - The Mother of all Battles
Photo Album 28 - The First Night - F-111
Photo Album 29 - My kids are in on the action - Christian's Dioramas
Photo Album 30 - My kids are in on the action - Nicole's Dinosaurs
Photo Album 31 - Coming Soon - Operation Market Garden
Photo Album 32 - The War Room
Photo Album 33 - Antique Ships Restoration Project
Photo Album 34 - Restoration Project II
Photo Album 35 - Restoration Project III
Photo Album 36 - Restoration Project IV
Contact Me
Related Links

WORLD WAR II DIORAMAS
"One Last Look"
Chance-Vought OS2U Kingfisher

OS2UOverview2.jpg

Above: An OS2U Kingfisher floatplane. Struck by enemy fire in the engine compartment and wing, this venerable aircraft was brought to safety by its crew on some remote Pacific island. In this model, the resin water was mixed just right, resulting in a realistic pattern of lazy waves coming ashore at this lagoon. The plane is named after my wonderful neighbor Beth - she is as dependable as this sturdy floatplane and will always get you home safely. The rock formations ashore are actually large landscaping wood chips found in any gardening dept. of your local Home Depot or Wal-Mart. The depth of the water is simulated by painting the Celluclay prior to the resin layers; deep water is dark blue, shallowing to lighter blue, and then blue-green to clear. Add tufts of grass for a floating algae effect as the layers of resin are poured.

OS2UOverview5.jpg

Above: The front of the diorama. The crew turn back for "One Last Look" as they prepare to trudge inland to reconnoiter the island.

topview.jpg

Above: An overview of the Kingfisher. The Kingfisher was the standard catapult scout plane on US battleships and cruisers throughout most of the war. The wing was made of one large metal spar forward, and the back half was metal ribs with a fabric covering to save weight. As a result, the wing sections weathered differently, with the fabric fading much faster than the metal - this is evident in the picture above.

cabin.jpg

Above: The whole crew compartment, showing the swivel for the .30 caliber gun in the rear gunner's compartment. Just visible forward of the gun is the circular radio antenna.

PREVIOUS PAGE

NEXT PAGE

cornerrocks.jpg

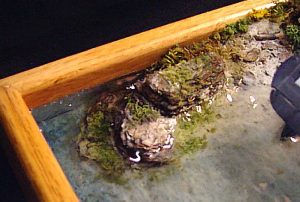
Above: The left front corner of the diorama, showing clearly how effective wood chips can simulate rock. Before pouring the resin, glue plant life in place along the bottom border and up the face of the "rock". Be sure to paint the inside of your wood frame a neutral light blue up to the level of your resin pour - if you don't, you will get a brown reflection in your water.

crew2.jpg

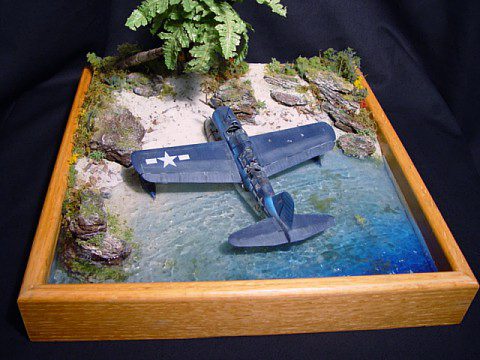
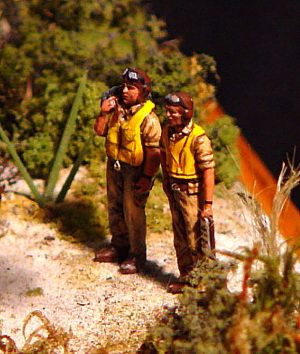
Above: The crew stare at their aircraft with a completely emotionless look - they are still in shock from their ordeal. The pilot, in the forefront, has taken his clipboard with him - more out of habit then necessity. The gunner has taken whatever useful items he could gather in the bag thrown over his shoulder.

engine.jpg

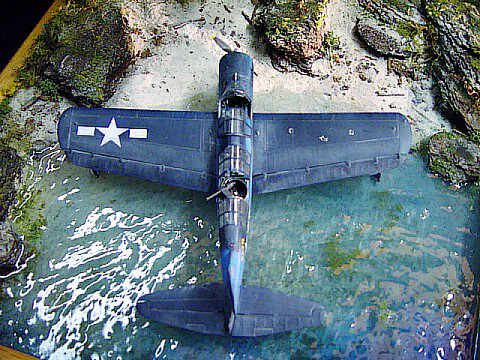
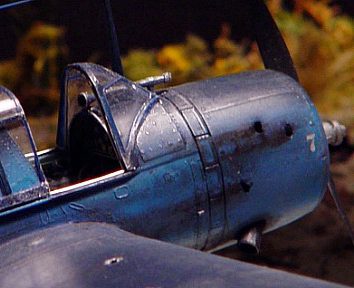
Above: The engine compartment, showing the hits sustained that brought down the aircraft. Oil has streaked back over the fuselage. This is easily simulated with pastels. The damage must be planned before assembly. The engine compartment walls were thinned with a Dremel tool, allowing me to poke a blade through the outside and cause a jagged hole. The "metal" must bend inwards for a realistic look.

gunnercabin.jpg

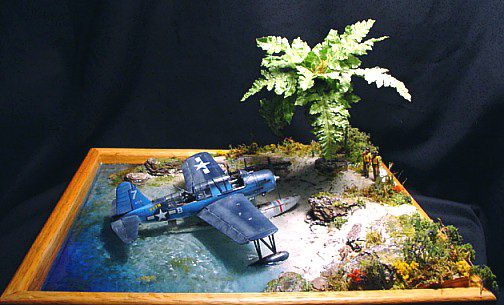
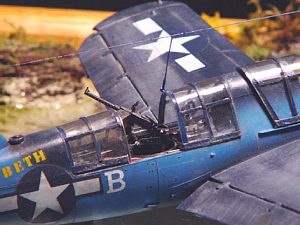
Above: This shot shows the aircraft's name painted next to the gunner's station. The letters are rub-ons. I use rub-ons as often as possible for all numbers and letters - this eliminates the need to cut off decal film, a tedious and unforgiving task. Coat all rub-ons with dull coat or gloss coat. The faded fabric cover on the wings and control surfaces is clear in this picture.